

What if the most indulgent, crowd-pleasing dessert you’ve ever tasted required absolutely zero baking? Hard to believe, right? This Easy Biscoff Cheesecake is here to challenge everything you thought you knew about making restaurant-quality cheesecake at home. With its buttery caramelized cookie crust and silky smooth cream cheese filling, this recipe is about to become your new obsession.
Whether you’re a seasoned baker or a complete kitchen novice, this Lotus Biscoff Cheesecake recipe delivers jaw-dropping results every single time. The rich, spiced warmth of Biscoff cookies combined with a luscious no-bake cheesecake filling creates a dessert that tastes far more complex than the effort required. This easy Biscoff cheesecake is creamy, indulgent, and perfect for any occasion. Let’s dive in and make the best cheesecake recipe magic happen.
Table of Contents
Why You’ll Love This Recipe
Biscoff cookies — those iconic caramelized, spiced Belgian speculoos biscuits — have taken the dessert world by storm. Their unique flavor profile, featuring hints of cinnamon, ginger, and brown sugar, makes them an extraordinary base and topping for cheesecake.
This creamy Biscoff dessert combines the beloved Biscoff flavor with a no-bake cheesecake recipe that sets perfectly in the refrigerator. No water baths, no cracked tops, no stress. Just pure, unapologetic deliciousness that will earn you endless compliments.
Ingredients List
Gather these simple, high-quality ingredients before you begin. Every component plays a crucial role in achieving that perfect texture and flavor balance.
For the Biscoff Cookie Crust:
- 300g (about 30) Lotus Biscoff cookies — the star of the show; use original, not caramelized spread
- 100g (7 tablespoons) unsalted butter, melted — binds the crust together beautifully
- Pinch of fine sea salt — enhances the caramelized cookie flavor
For the Cheesecake Filling:
- 600g (21 oz) full-fat cream cheese, softened — Philadelphia or similar brand works best; substitution: dairy-free cream cheese for a vegan version
- 200g (¾ cup) Biscoff cookie spread (smooth) — the secret weapon for deep, spiced flavor
- 100g (½ cup) powdered sugar, sifted — adjust to taste; substitution: coconut sugar for a less refined option
- 300ml (1¼ cups) heavy whipping cream, cold — must be cold for proper whipping; substitution: coconut cream for dairy-free
- 1 teaspoon pure vanilla extract — rounds out the flavor profile
- 1 tablespoon fresh lemon juice — adds a subtle tang that balances sweetness
For the Topping:
- 150g (½ cup) Biscoff cookie spread, warmed — for drizzling over the top
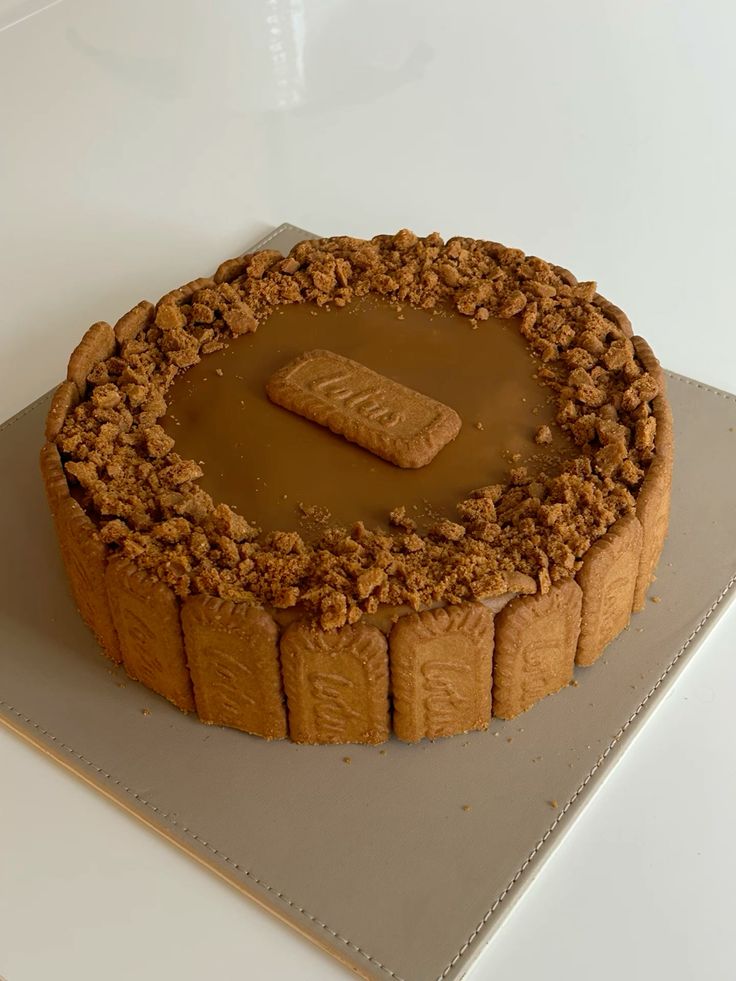
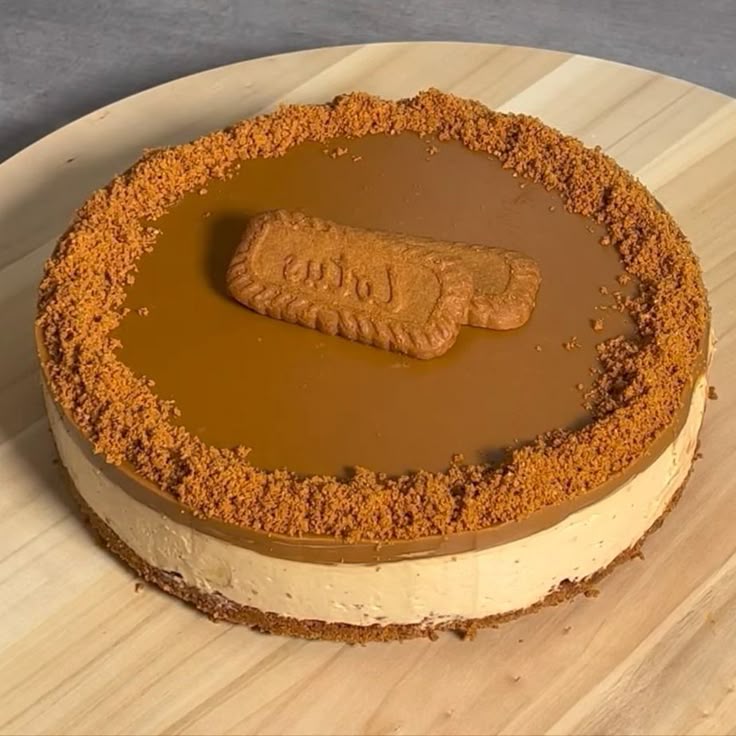
- 6–8 whole Biscoff cookies — for decoration
- Optional: crushed Biscoff cookies — for extra crunch and visual appeal
Timing
One of the greatest advantages of this Easy Biscoff Cheesecake is how efficiently it comes together. Here’s a complete breakdown of your time investment:
- Preparation Time: 25 minutes
- Chilling Time: 6 hours (or overnight for best results)
- Total Time: Approximately 6 hours 25 minutes
The active hands-on time is just 25 minutes — roughly 35% less active work than a traditional baked cheesecake, which typically requires 90+ minutes of preparation and baking. The refrigerator does the heavy lifting while you relax. Plan ahead by making this the night before your event for a completely stress-free dessert experience.
Step-by-Step Instructions
Follow these carefully crafted steps for a flawless cheesecake every time. Read through all steps before beginning to ensure smooth execution.
Step 1: Prepare Your Pan
Lightly grease a 9-inch (23cm) springform pan with butter or non-stick spray. Line the bottom with a circle of parchment paper for effortless removal later. A springform pan is non-negotiable here — it allows you to release the cheesecake cleanly without damaging those beautiful edges.
Step 2: Make the Biscoff Crust
Place the Biscoff cookies in a food processor and pulse until they resemble fine breadcrumbs. Alternatively, place them in a zip-lock bag and crush with a rolling pin — a wonderfully therapeutic process! Transfer crumbs to a bowl, pour in the melted butter and pinch of salt, and mix until the mixture resembles wet sand.
Press the mixture firmly and evenly into the bottom of your prepared springform pan. Use the flat bottom of a measuring cup to compact it tightly. Place in the refrigerator for 15 minutes to firm up while you prepare the filling.
Step 3: Whip the Heavy Cream
In a large, chilled bowl, whip the cold heavy cream using an electric hand mixer or stand mixer fitted with a whisk attachment. Beat on medium-high speed until stiff peaks form — this typically takes 3–4 minutes. Be careful not to over-whip, as this can cause the cream to become grainy. Set aside in the refrigerator.
Step 4: Make the Cream Cheese Filling
In a separate large bowl, beat the softened cream cheese on medium speed until completely smooth and lump-free, about 2 minutes. Add the Biscoff cookie spread, powdered sugar, vanilla extract, and lemon juice. Beat again until everything is perfectly combined and silky smooth, scraping down the sides as needed.
Step 5: Fold and Combine
Gently fold the whipped cream into the Biscoff cream cheese mixture in three additions. Use a large spatula and a gentle folding motion — not stirring — to preserve the air you’ve whipped in. This is what gives the cheesecake its light yet creamy texture. Continue until no white streaks remain.
Step 6: Fill and Chill
Pour the cheesecake filling over the chilled crust and spread it into an even layer using an offset spatula. Smooth the top as much as possible for a professional finish. Cover the pan loosely with plastic wrap and refrigerate for a minimum of 6 hours, though overnight chilling yields the firmest, most sliceable results.
Step 7: Add the Topping and Serve
Just before serving, gently warm the Biscoff spread in a microwave-safe bowl for 20–30 seconds until it reaches a pourable consistency. Carefully remove the cheesecake from the springform pan and transfer to a serving plate. Drizzle or pour the warmed Biscoff spread over the top, decorate with whole and crushed Biscoff cookies, and serve immediately.

The Best Lotus Biscoff Cheesecake Recipe Ever
Ingredients
For the Biscoff Cookie Crust:
- 300 g about 30 Lotus Biscoff cookies — the star of the show; use original, not caramelized spread
- 100 g 7 tablespoons unsalted butter, melted — binds the crust together beautifully
- Pinch of fine sea salt — enhances the caramelized cookie flavor
For the Cheesecake Filling:
- 600 g 21 oz full-fat cream cheese, softened — Philadelphia or similar brand works best; substitution: dairy-free cream cheese for a vegan version
- 200 g ¾ cup Biscoff cookie spread (smooth) — the secret weapon for deep, spiced flavor
- 100 g ½ cup powdered sugar, sifted — adjust to taste; substitution: coconut sugar for a less refined option
- 300 ml 1¼ cups heavy whipping cream, cold — must be cold for proper whipping; substitution: coconut cream for dairy-free
- 1 teaspoon pure vanilla extract — rounds out the flavor profile
- 1 tablespoon fresh lemon juice — adds a subtle tang that balances sweetness
For the Topping:
- 150 g ½ cup Biscoff cookie spread, warmed — for drizzling over the top
- 6 –8 whole Biscoff cookies — for decoration
- Optional: crushed Biscoff cookies — for extra crunch and visual appeal
Video
Did you try our recipe?
There are no reviews yet. Be the first one to write one.
Nutritional Information
The following nutritional estimates are based on 12 equal servings per cheesecake. Individual values may vary slightly depending on specific brands used.
- Calories: approximately 485 per slice
- Total Fat: 34g (Saturated Fat: 19g)
- Carbohydrates: 38g (Sugars: 22g)
- Protein: 6g
- Fiber: 0.5g
- Sodium: 280mg
- Cholesterol: 95mg
This is undeniably an indulgent treat. However, compared to many restaurant cheesecakes, which can clock in at 600–800 calories per slice, this homemade version gives you better control over ingredients and portions. Enjoying a smaller slice or making it in a mini cheesecake format are great ways to manage serving size without sacrificing satisfaction.
Healthier Alternatives for the Recipe
Want to enjoy this Easy Biscoff Cheesecake with a slightly lighter footprint? These smart swaps maintain the beloved flavor while accommodating various dietary needs.
- Lower-fat version: Replace full-fat cream cheese with a reduced-fat variety. Note that the texture will be slightly less rich but still delicious.
- Dairy-free/vegan option: Use dairy-free cream cheese (such as Violife or Kite Hill), coconut cream instead of heavy cream, and verify your Biscoff cookies are vegan-friendly (most are!).
- Reduced sugar: Cut the powdered sugar by 25–30% and rely on the natural sweetness of the Biscoff spread. The flavor remains robust.
- Gluten-free adaptation: Swap standard Biscoff cookies for gluten-free speculoos cookies, which are increasingly available in specialty stores and online.
- Protein boost: Blend 2 tablespoons of unflavored Greek yogurt into the cream cheese mixture for added protein and a pleasant tang.
- Smaller portions: Make individual mini cheesecakes in a muffin tin lined with cupcake liners. Each mini cheesecake is naturally portion-controlled and perfect for parties.
Serving Suggestions
Presentation elevates this already stunning dessert from impressive to absolutely unforgettable. Here are creative ways to serve and enjoy your masterpiece.
- Classic elegance: Serve chilled slices on white dessert plates with a light dusting of powdered sugar and a single Biscoff cookie standing upright on top.
- Warm contrast: Pair a cold slice with a scoop of vanilla bean ice cream for a hot-cold temperature contrast that is genuinely extraordinary.
- Coffee pairing: Serve alongside a strong espresso, cappuccino, or chai latte. The spiced notes in Biscoff complement coffee and tea flavors beautifully.
- Fruit accompaniment: Fresh sliced strawberries, raspberries, or caramelized bananas alongside a slice add brightness and cut through the richness.
- Dessert bar star: Cut into bite-sized squares and display on a tiered dessert stand at parties. Guests can grab a piece without needing a fork or plate.
- Holiday twist: During festive seasons, garnish with a light sprinkle of cinnamon, star anise, or edible gold dust for a show-stopping centerpiece.
Common Mistakes to Avoid
Even the simplest recipes have potential pitfalls. Avoid these common errors to guarantee a perfect result every time you make this No-Bake Cheesecake Recipe.
- Using cold cream cheese: Cold cream cheese will not blend smoothly and will leave lumps in your filling. Always allow it to come to room temperature for at least 30–45 minutes before mixing.
- Under-chilling the cheesecake: Skipping or shortening the chilling time results in a filling that won’t hold its shape when sliced. Six hours is the absolute minimum; overnight is strongly preferred.
- Over-mixing after adding whipped cream: Vigorous stirring after folding in the whipped cream deflates it, resulting in a dense rather than light and airy texture. Fold gently and stop as soon as combined.
- Not pressing the crust firmly enough: A loosely packed crust will crumble when sliced. Use firm, even pressure and a flat-bottomed tool to compact it properly.
- Skipping the parchment paper: Without parchment on the base, the crust may stick, making clean removal from the springform pan difficult and messy.
- Adding hot Biscoff topping to the cheesecake: Pouring very hot spread over the chilled cheesecake can melt the surface. Warm it gently until just pourable, not hot.
- Using low-fat whipping cream: Only heavy whipping cream (36%+ fat content) will whip to stiff peaks reliably. Light cream or half-and-half will not provide the necessary structure.
Storing Tips for the Recipe
Proper storage ensures your cheesecake stays fresh, flavorful, and structurally sound for as long as possible. Follow these best practices.
Refrigerator storage: Cover the cheesecake tightly with plastic wrap or store individual slices in an airtight container. It will keep beautifully in the refrigerator for up to 5 days. The flavor actually deepens and improves after the first 24 hours as the Biscoff flavors meld together.
Freezer storage: This cheesecake freezes exceptionally well. For best results, freeze the cheesecake without


