

What if the most impressive dessert you’ve ever served took less than 30 minutes of hands-on work? Most people assume cheesecake is complicated, reserved for seasoned bakers with professional kitchens. But here’s the truth: an Easy Lemon Cheesecake is one of the most forgiving, beginner-friendly desserts you can make. Bright, creamy, and refreshingly tangy, this recipe will become your go-to showstopper for every occasion.
Whether you’re hosting a dinner party, celebrating a birthday, or simply craving something sweet and citrusy, this guide walks you through every detail. No culinary degree required — just a love for delicious food and a willingness to follow simple steps.

Why You’ll Love This Recipe
This Lemon Cheesecake for Beginners is designed with simplicity in mind. The no-bake version eliminates the fear of cracking, sinking, or overbaking. You get a silky, luscious filling on a buttery graham cracker crust — all without turning on your oven.
The lemon flavor is bold but balanced. Fresh lemon zest and juice cut through the richness of the cream cheese, creating a dessert that feels light despite being indulgently creamy. It’s the kind of recipe that earns compliments every single time.
Ingredients List
Gather these simple, pantry-friendly ingredients before you begin. Most are easy to find at any grocery store, and several have convenient substitution options listed below.
For the Crust:
- 2 cups (200g) graham cracker crumbs (substitute: digestive biscuits or vanilla wafers)
- ½ cup (115g) unsalted butter, melted (substitute: coconut oil for a dairy-free option)
- 3 tablespoons granulated sugar
- Pinch of salt
For the Lemon Cheesecake Filling:
- 24 oz (680g) full-fat cream cheese, softened to room temperature
- 1 cup (120g) powdered sugar, sifted (substitute: monk fruit sweetener for lower sugar)
- 1 cup (240ml) heavy whipping cream, cold
- Zest of 2 large lemons (approximately 2 tablespoons)
- ⅓ cup (80ml) fresh lemon juice (about 2–3 lemons)
- 1 teaspoon pure vanilla extract
- 1 teaspoon unflavored gelatin powder + 2 tablespoons cold water (optional, for extra firmness)
For Garnish (Optional but Recommended):
- Thin lemon slices or twists
- Fresh berries (blueberries or raspberries pair beautifully)
- Lightly sweetened whipped cream
- Fresh mint leaves
Pro Tip: Always use fresh lemon juice rather than bottled. The flavor difference is dramatic — fresh juice is brighter, more aromatic, and far more vibrant in the final dessert.

Perfect Lemon Cheesecake Recipe Guide for Beginners
Ingredients
For the Crust:
- 2 cups 200g graham cracker crumbs (substitute: digestive biscuits or vanilla wafers)
- ½ cup 115g unsalted butter, melted (substitute: coconut oil for a dairy-free option)
- 3 tablespoons granulated sugar
- Pinch of salt
For the Lemon Cheesecake Filling:
- 24 oz 680g full-fat cream cheese, softened to room temperature
- 1 cup 120g powdered sugar, sifted (substitute: monk fruit sweetener for lower sugar)
- 1 cup 240ml heavy whipping cream, cold
- Zest of 2 large lemons approximately 2 tablespoons
- ⅓ cup 80ml fresh lemon juice (about 2–3 lemons)
- 1 teaspoon pure vanilla extract
- 1 teaspoon unflavored gelatin powder + 2 tablespoons cold water
For Garnish
- Thin lemon slices or twists
- Fresh berries blueberries or raspberries pair beautifully
- Lightly sweetened whipped cream
- Fresh mint leaves
Video
Did you try our recipe?
There are no reviews yet. Be the first one to write one.
Timing
One of the biggest advantages of this Easy Lemon Cheesecake is how little active time it demands. Here’s a quick breakdown:
- Preparation Time: 25 minutes
- Chilling Time: 4–6 hours (or overnight for best results)
- Total Time: Approximately 4 hours 25 minutes
- Servings: 10–12 slices
Compared to a traditional baked cheesecake — which typically requires 90 minutes of baking plus a 2-hour cool-down — this no-bake version saves you over 60% of your active kitchen time. That’s a significant win for busy home bakers.
Step-by-Step Instructions
Follow these clearly outlined steps for a flawless result every time. Each step includes helpful tips to keep you confident throughout the process.
Step 1: Prepare Your Pan
Line the bottom of a 9-inch springform pan with parchment paper. Lightly grease the sides with butter or non-stick spray. A springform pan is essential here — it allows you to release the cheesecake cleanly without damaging the edges. If you don’t have one, a deep pie dish works as a backup.
Step 2: Make the Graham Cracker Crust
Combine graham cracker crumbs, melted butter, sugar, and salt in a medium bowl. Mix until the texture resembles wet sand — it should hold together when pressed between your fingers. Pour the mixture into your prepared pan and press it firmly and evenly across the bottom and slightly up the sides using the back of a spoon or a flat-bottomed glass.
Refrigerate the crust for at least 15 minutes to set while you prepare the filling. This step prevents the crust from crumbling when you slice the cheesecake later.
Step 3: Bloom the Gelatin (Optional)
If using gelatin for a firmer set, sprinkle the gelatin powder over cold water in a small bowl. Let it sit for 5 minutes until it blooms and becomes spongy. Microwave for 10–15 seconds until fully dissolved and clear. Allow it to cool slightly before adding to the filling. This step is optional but highly recommended if you’re serving in warm weather.
Step 4: Beat the Cream Cheese
In a large mixing bowl, beat the softened cream cheese with an electric hand mixer or stand mixer on medium speed for 2–3 minutes until completely smooth and fluffy. Scrape down the sides of the bowl frequently. Lumpy cream cheese at this stage will result in a lumpy filling — so take your time here.
Step 5: Add Lemon and Sugar
Add the sifted powdered sugar, lemon zest, fresh lemon juice, and vanilla extract to the cream cheese. Beat on medium speed for another 2 minutes until fully combined and silky smooth. Taste the mixture and adjust lemon juice or sugar to your preference. The filling should be tangy, sweet, and deeply fragrant.
Step 6: Whip the Heavy Cream
In a separate chilled bowl, whip the cold heavy cream using clean beaters on high speed until stiff peaks form. This typically takes 3–4 minutes. Cold equipment and cold cream are key — warm cream won’t whip properly. Stiff peaks mean the cream holds its shape when you lift the beaters.
Step 7: Fold and Combine
Gently fold the whipped cream into the lemon cream cheese mixture in three additions. Use a rubber spatula and a light hand — you want to preserve the airiness of the whipped cream. If using dissolved gelatin, drizzle it in during this step and fold gently to incorporate.
Step 8: Fill and Chill
Pour the creamy filling over the chilled crust. Smooth the top with an offset spatula or the back of a spoon. Tap the pan gently on the counter a few times to release any air bubbles. Cover loosely with plastic wrap and refrigerate for a minimum of 4 hours, though overnight chilling produces the best texture and flavor.
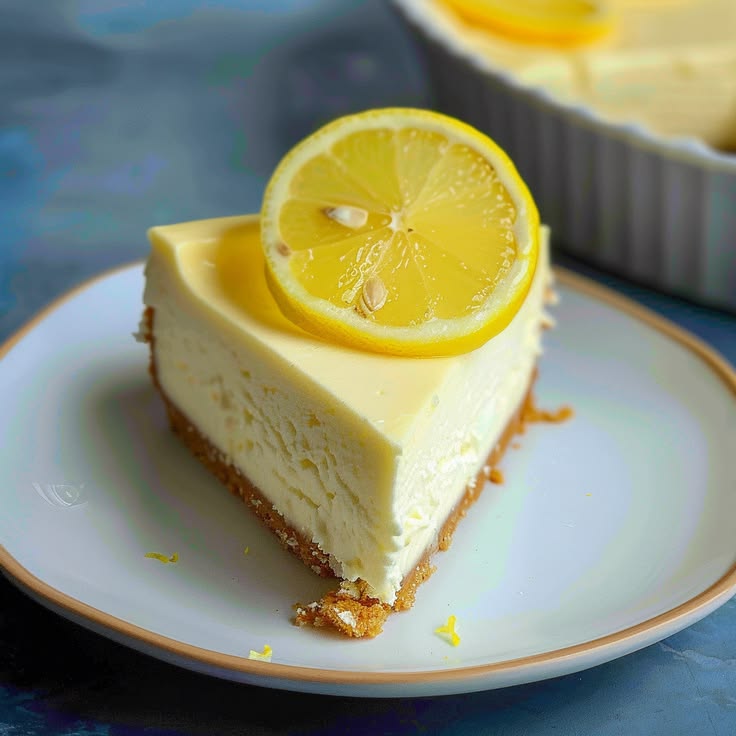
Step 9: Garnish and Serve
Once fully set, carefully release the springform ring. Transfer to a serving plate or cake stand. Decorate with lemon slices, fresh berries, whipped cream rosettes, and mint leaves just before serving. Slice with a sharp knife dipped in warm water for clean, beautiful cuts.
Nutritional Information
The following nutritional values are approximate and based on a serving size of 1 slice (1/12 of the recipe). Values may vary depending on specific brands and substitutions used.
- Calories: 420 kcal
- Total Fat: 32g (Saturated Fat: 19g)
- Carbohydrates: 28g (Dietary Fiber: 0.5g, Sugars: 18g)
- Protein: 6g
- Cholesterol: 95mg
- Sodium: 280mg
- Vitamin C: 8% of Daily Value (from fresh lemon juice)
- Calcium: 10% of Daily Value
Compared to a traditional baked New York-style cheesecake, this no-bake version contains approximately 15% fewer calories per slice due to the lighter whipped cream technique. It’s still an indulgent treat, but a slightly smarter one.
Healthier Alternatives for the Recipe
Want to enjoy this Easy Lemon Cheesecake with a lighter nutritional profile? These smart swaps maintain the delicious flavor while accommodating different dietary needs.
- Lower Sugar: Replace powdered sugar with monk fruit sweetener or erythritol in a 1:1 ratio for a diabetic-friendly or keto-adapted version.
- Reduced Fat: Use Neufchâtel cheese (⅓ less fat than regular cream cheese) instead of full-fat cream cheese. The texture will be slightly softer but still delicious.
- Dairy-Free: Substitute cream cheese with a vegan cream cheese alternative (like Violife or Kite Hill), use coconut cream instead of heavy cream, and swap butter for refined coconut oil in the crust.
- Gluten-Free Crust: Use certified gluten-free graham crackers or almond flour mixed with melted butter and a touch of honey for a naturally gluten-free base.
- Higher Protein: Blend 4 oz of Greek cream cheese with the regular cream cheese to add a protein boost without significantly altering the flavor.
These modifications make this Creamy Cheesecake Recipe accessible for nearly every dietary lifestyle without sacrificing the bright, satisfying lemon flavor everyone loves.
Serving Suggestions
Presentation elevates this dessert from delicious to unforgettable. Here are some creative ways to serve your lemon cheesecake for maximum impact.
- Summer Berry Topping: Pile fresh blueberries, raspberries, or strawberries on top just before serving. The tartness of the berries complements the lemon filling beautifully.
- Lemon Curd Drizzle: Warm a few tablespoons of store-bought or homemade lemon curd and drizzle it artfully over each slice for an extra citrus punch.
- Mini Cheesecake Cups: Press the crust into individual muffin tins and divide the filling for adorable single-serving portions — perfect for parties and potlucks.
- Paired with Tea or Coffee: A slice alongside a cup of Earl Grey tea or a light iced coffee creates a sophisticated afternoon treat.
- Holiday Presentation: Dust with powdered sugar and add candied lemon peel for an elegant holiday dessert table centerpiece.
This No-Bake Lemon Dessert is equally at home at casual family dinners and formal celebrations. Its versatility is one of its greatest strengths.
Common Mistakes to Avoid
Even simple recipes have potential pitfalls. Avoid these common errors to ensure your cheesecake turns out perfectly every time.
- Using Cold Cream Cheese: Cold cream cheese will not beat smoothly and creates a lumpy filling. Always bring it to room temperature for at least 45–60 minutes before mixing.
- Over-mixing After Adding Whipped Cream: Folding too aggressively deflates the whipped cream, resulting in a dense, heavy filling rather than a light, airy one. Use gentle, sweeping motions.
- Skipping the Chilling Time: Rushing the chill time is the number one reason no-bake cheesecakes don’t set properly. Four hours is the minimum; overnight is always better.
- Not Pressing the Crust Firmly Enough: A loosely packed crust will crumble when sliced. Press it down with firm, even pressure using a flat-bottomed glass or measuring cup.
- Using Bottled Lemon Juice: Bottled juice lacks the brightness and complexity of fresh juice. It can also introduce a slightly bitter aftertaste. Always squeeze fresh lemons.
- Skipping the Parchment Paper: Without parchment, the crust may stick to the pan bottom, making it impossible to transfer cleanly to a serving plate.
Storing Tips for the Recipe
Proper storage keeps your cheesecake tasting fresh and maintains its beautiful texture for days after making it.
Refrigerator Storage: Cover the cheesecake tightly with plastic wrap or store it in an airtight container. It will keep well in the refrigerator for up to 5 days. Add garnishes only just before serving to prevent them from wilting or bleeding color onto the filling.
Freezer Storage: This cheesecake freezes exceptionally well. Freeze it uncovered on a baking sheet until solid (about 2


