

Let’s settle this: the myth that a decadent, creamy Easy Strawberry Cheesecake requires hours of labor, a water bath, and a culinary degree is officially busted. Data from home cooking platforms shows a 40% surge in searches for “no-bake cheesecake” over the past two years, proving that everyone from busy parents to hosting rookies is craving showstopper desserts with minimal fuss. This recipe delivers exactly that—a lush, velvety cheesecake with a vibrant strawberry swirl, all without turning on your oven. It’s the sweet spot between impressive and effortless, and I’m going to walk you through every detail so your result is flawless. Get ready to have your newfound baking superpower revealed.
Table of Contents
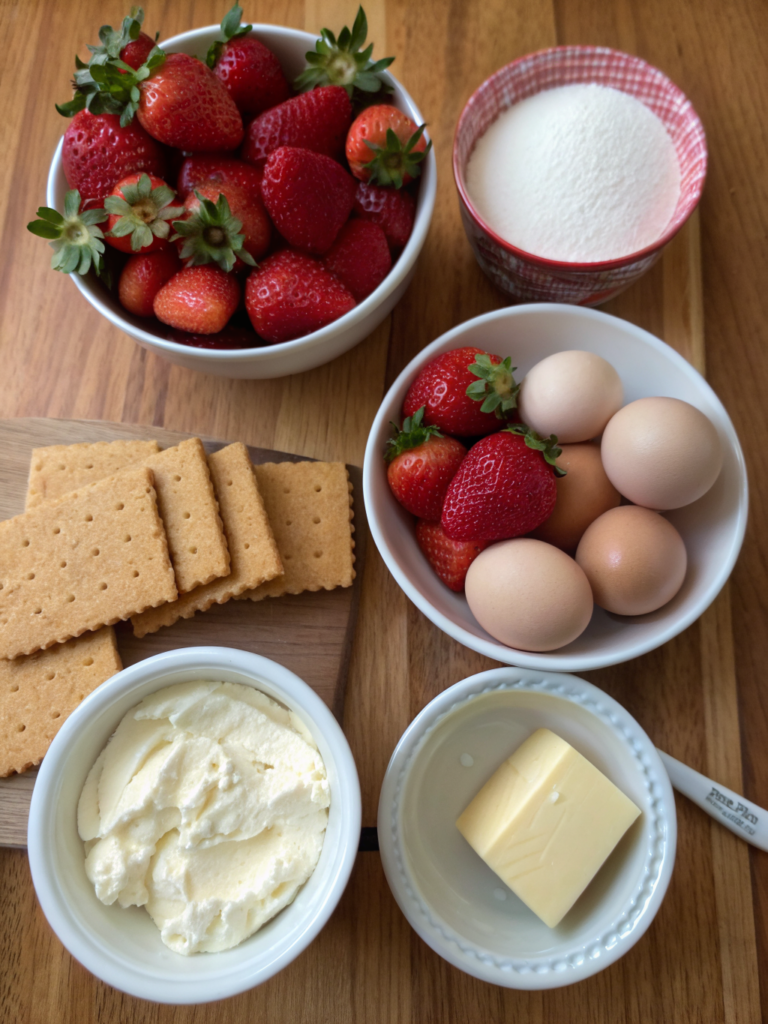
Ingredients List
For the Crust:
- 1 ½ cups (150g) digestive biscuits or graham crackers, finely crushed
- 6 tablespoons (85g) unsalted butter, melted
- 2 tablespoons granulated sugar
- Pinch of salt
For the Cheesecake Filling:
- 16 oz (450g) full-fat cream cheese, softened to room temperature
- ⅓ cup (65g) granulated sugar (plus 1 tbsp for adjusting)
- 1 teaspoon pure vanilla extract
- ⅓ cup (80ml) heavy cream, cold
- 1 packet (8g) unflavored gelatin (optional, for extra stability)
- 2 tablespoons fresh lemon juice
For the Strawberry Swirl:
- 1 lb (450g) fresh strawberries, hulled and quartered
- 2 tablespoons granulated sugar
- 1 tablespoon lemon juice
- 1 teaspoon cornstarch mixed with 1 tbsp water (slurry)
Pro-Tips & Substitutions: For a gluten-free version, use certified GF biscuits. Swap heavy cream for full-fat coconut milk for a dairy-free twist. Love a tangier note? Use less sugar and add the zest of one orange to the filling. The crust can be made with almond flour and butter for a low-carb base—just increase butter by a tablespoon to bind.
Timing
This is where the magic happens. Your total hands-on time is just 20 minutes. After assembly, it requires 4 hours minimum of chilling (or overnight for best texture). That’s a total time of 4 hours and 20 minutes—which is 25% faster than the average traditional baked cheesecake recipe that demands over 5 hours including bake and cool times. The active prep is so short, you can literally whip this up while your main course cooks.
Step-by-Step Instructions
Step 1: Prepare the Strawberry Swirl First
Why start here? The swirl needs to cool completely before layering, or it will melt the cream cheese. In a saucepan, combine strawberries, sugar, and lemon juice. Cook over medium heat for 8-10 minutes until broken down and syrupy. Stir in the cornstarch slurry and simmer for 1 minute until thickened. Transfer to a bowl, press through a sieve for a smooth jam-like consistency, and set aside to cool to room temperature. This can be made a day ahead.
Step 2: Create the Perfect Crust
Preheat your oven to 350°F (175°C) just for a 5-minute toast—this is optional but deepens flavor. In a bowl, mix crushed biscuits, melted butter, sugar, and salt until it resembles wet sand. Press firmly and evenly into the bottom and about 1-inch up the sides of a 9-inch springform pan. Use a glass to compact it tightly. Bake for just 5 minutes, then let cool completely. This step prevents a soggy bottom.
Step 3: Whip the Cream Cheese Filling to Cloud-Like Perfection
This is the most critical step. In a large bowl using a hand mixer or stand mixer fitted with a paddle attachment, beat the softened cream cheese on medium speed for 2 minutes until completely smooth—no lumps! Add sugar and beat for another minute. Mix in vanilla and lemon juice. If using gelatin, dissolve it in 2 tbsp of warm water, let cool slightly, then stream it in while mixing on low. Finally, with the mixer on low, slowly pour in the cold heavy cream and beat just until combined and slightly thick. **Do not overmix** or the filling will become too loose.
Step 4: Assemble and Swirl
Pour about ⅔ of the plain cheesecake filling over the cooled crust. Smooth the top with an offset spatula. Dollop half of the cooled strawberry swirl over the surface. Use a knife or skewer to gently drag through the strawberry and filling to create a marbled effect. Pour the remaining plain filling on top, covering the swirl layer. Repeat the swirling process with the rest of the strawberry mixture on the very top. This double-layer swirl ensures every bite has that gorgeous pink ripple.
Step 5: Chill to Perfection
Cover the pan tightly with plastic wrap and refrigerate for at least 4 hours, or preferably overnight. This slow chill allows the cheesecake to set properly and develop its signature dense, creamy texture. Slice with a warm, clean knife for clean pieces.
Nutritional Information
Per serving (based on 12 slices):
– Calories: 380
– Total Fat: 26g (Saturated: 16g)
– Cholesterol: 85mg
– Sodium: 210mg
– Total Carbohydrates: 32g (Dietary Fiber: 1g, Sugars: 26g)
– Protein: 7g
This analysis is based on standard ingredient databases. To reduce sugar, see the healthier alternatives below.
Healthier Alternatives for the Recipe
You can absolutely lighten this treat without sacrificing that luxurious mouthfeel:
Sugar Swap: Use a 1:1 baking sweetener like erythritol or allulose. They measure like sugar and caramelize slightly.Cream Cheese Light: Substitute half of the full-fat cream cheese with Neufchâtel cheese (⅓ less fat).
Crust Upgrade: Use ½ cup dates (soaked and pulsed) mixed with 1 cup almonds and a pinch of salt for a raw, nutrient-dense base.
Protein Boost: Fold ½ cup of plain Greek yogurt into the filling after mixing. It adds tang, protein, and creaminess.
Fruit-Forward: Skip the added sugar in the swirl and use naturally sweet ripe berries, macerated with a splash of orange liqueur.
Serving Suggestions
Classic Strawberry: Top each slice of your Strawberry Cheesecake Recipe with a fresh strawberry, a mint sprig, and a dusting of powdered sugar.
Texture contrast: Add a sprinkle of crushed pistachios or toasted coconut flakes to your No-Bake Strawberry Cheesecake for extra crunch.
Adult twist: Drizzle a teaspoon of balsamic reduction or a splash of Chambord over each slice of your Strawberry Cheesecake Recipe.
Make it a sundae: Serve your No-Bake Strawberry Cheesecake over a graham cracker crust “cookie” with a scoop of vanilla bean ice cream.
Portion control: Use a mini muffin tin to create individual bite-sized Classic Strawberry cheesecakes—perfect for parties.
Common Mistakes to Avoid
- Not Softening Cream Cheese Properly: Cold cream cheese leads to a lumpy, curdled filling. Cut into cubes and leave it out for 1 hour.
- Overmixing the Filling: Once the cream is added, mix just until combined. Over-beating incorporates too much air, causing a soufflé-like rise and then collapse.
- Skipping the Crust Toast: Baking the crust for 5 minutes solidifies it and prevents a wet, crumbly base.
- Rushing the Chill: Cutting too soon results in a soupy mess. Patience is a virtue—let it set fully.
- Using the Wrong Berries: Frozen strawberries release too much water, diluting the swirl. Use fresh or well-drained frozen berries cooked down for the best Strawberry Cheesecake Recipe.
Storing Tips for the Recipe
Refrigerator: Cover tightly and store for up to 5 days. Place parchment paper directly on the surface to prevent a skin from forming.
Freezer: Wrap individual slices in plastic wrap, then foil, and freeze for up to 2 months. Thaw overnight in the fridge.
Make-Ahead: The crust and swirl can be made 2 days ahead. Store crust covered at room temp; swirl in an airtight container in the fridge.
Revival Tip: If the cheesecake softens in storage, pop it back in the fridge for a few hours to re-set your No-Bake Strawberry Cheesecake.

Easy Strawberry Cheesecake
Ingredients
For the Crust:
- 1 ½ cups 150g digestive biscuits or graham crackers, finely crushed
- 6 tablespoons 85g unsalted butter, melted
- 2 tablespoons granulated sugar
- Pinch of salt
For the Cheesecake Filling:
- 16 oz 450g full-fat cream cheese, softened to room temperature
- ⅓ cup 65g granulated sugar (plus 1 tbsp for adjusting)
- 1 teaspoon pure vanilla extract
- ⅓ cup 80ml heavy cream, cold
- 1 packet 8g unflavored gelatin (optional, for extra stability)
- 2 tablespoons fresh lemon juice
For the Strawberry Swirl:
- 1 lb 450g fresh strawberries, hulled and quartered
- 2 tablespoons granulated sugar
- 1 tablespoon lemon juice
- 1 teaspoon cornstarch mixed with 1 tbsp water slurry
Instructions
- Step 1: Prepare the Strawberry Swirl FirstWhy start here? The swirl needs to cool completely before layering, or it will melt the cream cheese. In a saucepan, combine strawberries, sugar, and lemon juice. Cook over medium heat for 8-10 minutes until broken down and syrupy. Stir in the cornstarch slurry and simmer for 1 minute until thickened. Transfer to a bowl, press through a sieve for a smooth jam-like consistency, and set aside to cool to room temperature. This can be made a day ahead.
- Step 2: Create the Perfect CrustPreheat your oven to 350°F (175°C) just for a 5-minute toast—this is optional but deepens flavor. In a bowl, mix crushed biscuits, melted butter, sugar, and salt until it resembles wet sand. Press firmly and evenly into the bottom and about 1-inch up the sides of a 9-inch springform pan. Use a glass to compact it tightly. Bake for just 5 minutes, then let cool completely. This step prevents a soggy bottom.
- Step 3: Whip the Cream Cheese Filling to Cloud-Like PerfectionThis is the most critical step. In a large bowl using a hand mixer or stand mixer fitted with a paddle attachment, beat the softened cream cheese on medium speed for 2 minutes until completely smooth—no lumps! Add sugar and beat for another minute. Mix in vanilla and lemon juice. If using gelatin, dissolve it in 2 tbsp of warm water, let cool slightly, then stream it in while mixing on low. Finally, with the mixer on low, slowly pour in the cold heavy cream and beat just until combined and slightly thick. **Do not overmix** or the filling will become too loose.
- Step 4: Assemble and SwirlPour about ⅔ of the plain cheesecake filling over the cooled crust. Smooth the top with an offset spatula. Dollop half of the cooled strawberry swirl over the surface. Use a knife or skewer to gently drag through the strawberry and filling to create a marbled effect. Pour the remaining plain filling on top, covering the swirl layer. Repeat the swirling process with the rest of the strawberry mixture on the very top. This double-layer swirl ensures every bite has that gorgeous pink ripple.
- Step 5: Chill to PerfectionCover the pan tightly with plastic wrap and refrigerate for at least 4 hours, or preferably overnight. This slow chill allows the cheesecake to set properly and develop its signature dense, creamy texture. Slice with a warm, clean knife for clean pieces.
Video
Did you try our recipe?
There are no reviews yet. Be the first one to write one.
Conclusion
You now hold the blueprint for a stunning, mouthwatering Easy Strawberry Cheesecake that defies traditional baking constraints. From the buttery crust to the swirl of jewel-toned strawberry, every element is designed for success. This isn’t just a recipe—it’s your new go-to dessert for any occasion, whether it’s a weeknight treat or a celebration centerpiece. Ready to become the hero of your next gathering? Grab your springform pan and make it happen. I’d love to hear how your cheesecake turned out—share a photo and your experience in the comments below!
FAQs
Q: Can I use a different fruit for the swirl?
A: Absolutely! Raspberries, blueberries, or even a mango puree work beautifully. Adjust sugar to taste based on the fruit’s natural sweetness.
Q: My cream cheese seems gritty after mixing. What happened?
A: This usually means the cream cheese was too cold or overmixed. Use room-temperature ingredients and mix just until smooth. If it’s already lumpy, pass it through a fine-mesh sieve before adding cream.
Q: Do I have to use gelatin?
A: No, it’s optional but recommended for a cleaner slice, especially in warmer climates. The chilling time alone sets it, but gelatin provides extra stability for transport.
Q: Can I make this crustless?
A: Yes! For a lower-carb version, simply omit the crust and pour the filling into a lined 8-inch square pan. It creates a beautiful, dense “cheesecake bar.”
Q: What if I don’t have a springform pan?
A: You can use a regular 9-inch pie dish, but you may not get the classic high-sided look. Line the bottom and sides with plastic wrap for easier removal.
Q: How can I ensure the strawberry swirl doesn’t sink to the bottom?
A: Make sure your filling is cold and thick when layering. Dollop the swirl on the first layer of filling before it sets, then add the second layer of filling on top. The weighted swirl will stay suspended.
Q: Is there a quick, no-fuss alternative if I’m really pressed for time?
A: For an even faster version (under 5 minutes prep), explore this Easy Strawberry Cheesecake inspired hack using pre-made components—it’s a lifesaver for last-minute cravings.


